Genesis--In the Beginning--Chapter 1

I am jealous! That pod looks awesome. Well another step closer to the finished project :) Looking good my friend. I need to learn how to use that tool myself too. I have never used one but it I understand correctly they hold thins in place as they are spring loaded? Nice job Stan :)
 
Sweet!!! It won't be long before I am mounting my pod.

I haven't even looked at how it is attached.... Stan, can you remove the pod, and still have the instruments in place and get to the wiring on the back, or is the pod and the instruments built into one piece?
 
Stan are you going of plans for setting up the hood? I don't have these yet. How are you taking your measurements? Thanks. Looking good.
 
I would have said a great marriage of man and machine. Both equally impressive.

Not sure that asking someone to copy plans is such a good idea?? I would venture that they belong to Nicolas and are intellectual property, unless he has released them which I do not think he has. Surely one would usually buy them from him, if he is selling.
 
Lookin' good Stan. I really like the Genesis. I like the welded tube receivers Nicholas uses on the axle strut. A lot of other designs use a u-bracket bolted on which has to handle the load kind of "sideways". In my opinion, this is far superior. But when the shock compresses and the axle strut raises, what keeps the drag strut from binding in its "receiver" at the axle? Even if it will use another rod end bearing there it looks like only a limited amount of movement. Easy for me to sit here and judge. I'm sure Nicholas has thought about this and designed it with the amount that it needs.

I would like to see the same type of welded receiver at the bottom of the diagonal engine support tubes. I know this use of u-brackets has been around a long time and, I think, has proven itself reliable (I had them on my Bee without a problem and they are on my new machine as well as my modified Air Command) but it still bothers my physics brain.

It's a beautiful machine.
 
Last edited:
Genesis Chapter 1, Verse 24.........And John said " Stan, do something to my Genesis and all will be good" ...

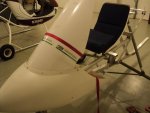
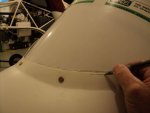
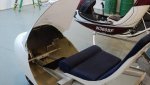
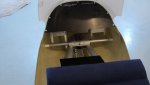
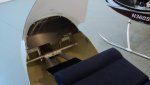
Right before Mentone I installed the top of the instrument cowling, and left the job unfinished until the windshield was installed. I came down early this morning and completed that. This was about all I can do on Johns Genesis until the next shipment.

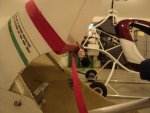
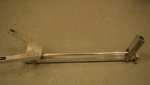
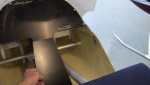
I was struggling doing this by myself, trying to bow the plexiglass...then duct tape the bow in place to the right curvature to fit inside the pod. It was apparent that one could get a front bolt in and this plexiglass could spring out and bust at the hole. Some minutes were pondering how to go about this without stopping traffic outside my shop and hijacking someone to come in and help me!

I decided to use a simple strap tie down. The corners on the precut plexi-glass were the perfect place to place the nylon strap over as that prevented any slipping, and drastic release of tension that could scratch the windscreen or hit me!

So I ratched down the strap until the curve fit the curve of the pod, started the front bolt, then got it into position where it was at the right angle and symetrical. The bolts were walked around from the front one at a time, and I soon had a very strong monolithic structure. I released the straps and it sprang out to its finished form.

This build will be on hold until Nicolas gets his production back on track. He has had some setbacks out of his control with power outaqes, shop damage, etc, and is working huge days to get things back on track. John so patiently and honorably want his customers...Brian and Gary to get their shipments first and I couldnt agree more.

I told John I dont have much time until late fall, but that I definitely would like to have all the components by the end of this year so I can get this machine together and flying after winter.

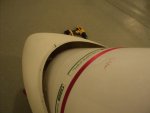
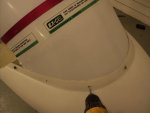
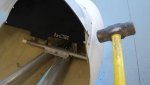
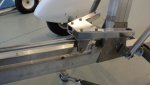
The last picture shows the ink mark on the pod. I am going to scribe a fine line that the pod will be sanded down to when I take this all apart. I did not do this initially just because if say the pod was slightly higher on one side, I could grind out the slight error and have the top of this nice and level.


Stan
 

Attachments

  • A 002.jpg
    A 002.jpg
    139.6 KB · Views: 3
  • A 005.jpg
    A 005.jpg
    133.4 KB · Views: 3
  • A 006.jpg
    A 006.jpg
    132.1 KB · Views: 3
  • A 001.jpg
    A 001.jpg
    139.5 KB · Views: 3
  • A 008.jpg
    A 008.jpg
    133.4 KB · Views: 3
  • A 009.jpg
    A 009.jpg
    130.4 KB · Views: 3
  • A 010.jpg
    A 010.jpg
    135.3 KB · Views: 3
  • A 011.jpg
    A 011.jpg
    132.6 KB · Views: 3
Looking real good, Stan.

I love the look of the pod on this gyro, and I'll definitely be copying your windshield mounting method.

Gary
 
I haven't been busy. I've been secretly waiting on you to post more pics so I can follow your lead. :). Mmwahahahaa!

Looking good stan. Will you take the windshield off for painting or mask it? I was waiting to do these steps until I painted the pod. What's your thoughts?
 
Stan you do such quality work. It is a delight to see and as entertaining and interesting as your Helicycle build.
 
Genesis Chapter 1, Verse 25

And Nicolas sent another package across the big pond, and Stan says...."this is good".


I received the instrument panel top and bottom section, the cyclic controls which were beautifully polished....and some other mysterious parts.

I do not have much available time the next several weeks....but will gnaw on these when I have a chance.

Once I recieve the tail kit, and get it fabricated.....my buddy John is going to have to come to Illinois and layout the paint scheme with my monster truck painter.....Mark Stevenson.

Watching Garys excellent tastes....and Gabors...John will have a variety of good ideas. Johns gyro will incorporate many excellent ideas from the forum, but I feel it will have its own identity as well.


Stan
 

Attachments

  • Sep17 016.jpg
    Sep17 016.jpg
    132.7 KB · Views: 2
  • Sep17 015.jpg
    Sep17 015.jpg
    107 KB · Views: 2
  • Sep17 017.jpg
    Sep17 017.jpg
    131.4 KB · Views: 2
LOL red yellow black is attractive and visible by all means although florescent colors are available too!!!!!!!!!!!!! Now get to work and finish that thing up before I finish up mine! :) You got two weeks to do it! :)
 
I came in early today to finish what I started last night....and that was to get that instrument panel to fit the already riveted and rivnutted preformed channel. Mistake on my part for assuming the panel would not come pre-drilled! The cart got a little ahead of the horse several weeks ago when I last worked on this Genesis. Anyway...I had to do some intuitive thinking to get the holes to all line up without drilling new ones...or starting over. It was finished early this morning and now back to my stairwork.

Greg and Brian....,my advice....install the panel onto that channel FIRST!!!! then make attach the fiberglass shroud.....then install it in the pod.......and not the exact opposite that I did! Of course once I saw the instrument panel already drilled out....Monday morning quarterbacking thoughts went through my head.

The last picture shows the lower panel just being held in place. I have to rivet some aluminum angle and attach some rivnuts and it will be installed.

Nicolas has the panel all black anodized with some nice engraving in it. Very sharp work Nicolas. I will someday get out my fly cutter and cut in Johns instruments when by ever he lets me know what he wants.

It all came out the same....just had my shorts in a knot for 1.5 hours of unnecessary struggling with some improvised methods.

Winter is coming and that is my best time of the year for finding extra hours for this project. I really want to have all the materials and Johns answers before the winter starts so I can get Johns gyro finished this winter.

Stan
 

Attachments

  • Sep22 004.jpg
    Sep22 004.jpg
    134.2 KB · Views: 5
  • Sep22 005.jpg
    Sep22 005.jpg
    127 KB · Views: 5
  • Sep22 006.jpg
    Sep22 006.jpg
    126.5 KB · Views: 5
  • Sep22 002.jpg
    Sep22 002.jpg
    130.3 KB · Views: 5
Stan,
You cannot imagine how happy the Granny G1sa is, as she sees her grandchildren grow and “blessed,” and are fruitful and multiple. They will fill the earth and subdue it; have dominion probably over all other flying machines that move in the air........:blabla: :blabla: :blabla:
 
Looking good Stan although I thought those pictures were retro. I found this picture circulating on the NET, it sure looks like your shop....... So what's the story here?

I just got back in country and look at what I find.

Stan has actually built and painted her and has been flying her for God only knows how long????:noidea:

That's my buddy!!:first:

I'll have to check out the rest of the thread when I get back from an appointment... I'v only read up to page 13 so far.

I've got a great deal more to read and see where we are at, very exciting!!!!

Thank you so much Stan!!!

Be back latter, see ya!!!
 

Attachments

  • Genesis.jpg
    Genesis.jpg
    111.3 KB · Views: 2
Last edited:
Genesis Chapter 1 Verse 26

And God said "Stan, if a 10 pound sledgehammer doesnt do the trick....get a heavier hammer"

Verse 27 And Stan said " the ten pounder worked just fine. This is good"


Verse 28 And Stan asked Nicolas " whats the best way to patch impact cracks in the pod?"


John- Glad you are back.....sorry to hear what has transpired in your family. Multi challenges and you are handling it well.


I may as well confess to you John how I improvised getting your instrument panel to fit the bolt holes. I thought I was going to have to go get my dads 16 pound sledgehammer...but my nice little 10 pounder did the trick well.

A few strategically place blows on your fuselage....."pursuaded" the bolt holes to line up....well almost. I dont think you will care of there are some one inch washers hiding the wollered out holes......thats what fender washers are for!


I just finished a curved stairway yesterday, and decided to work on Johns gyro today a few more hours than I had planned.

I have the back of the pod braced now...and the cyclic is attached to the keel. I used some hardware store bolts as Nicolas noticed the long bolts were missing in my pictures. He is sending them next order.

Hey Nicolas.....I know you are following these build threads. What is the best way to fix some impact cracks on Johns fuselage that my sledgehammer left? Plus....the fuselage was perfectly square with the frame....now its wondering off at about 5 degrees. Do I adjust the incidence of the rudder later to offset this steering effect? ........or do I impact the fuselage from the other side with the same force to get it back perfect again? Geeeeshhhh.....you fix one thing and it causes another problem...


Stan
 

Attachments

  • Sep22 007.jpg
    Sep22 007.jpg
    132.7 KB · Views: 4
  • Sep22 011.jpg
    Sep22 011.jpg
    130.7 KB · Views: 4
  • Sep22 009.jpg
    Sep22 009.jpg
    133.6 KB · Views: 4
Last edited:
Stan if he just dangles one leg out when flying, the drag should help even the flight out. If it's that bad, just use a lot of that aluminum tape and pull it up some. That should last a while.
 
just hammer it at the exact opposite side so that he will have impact marks from both sides.... that will look even. As far the offset....... buy for John a pair of shoes with uneven soles!!! that should give an offset to the rudder that will compensate for turning effect of the pod!!!!
 
What!! You keep those hammers away from her! I did not know you were abusive to women?:eek:

He told me on the phone today that he was going to use a sled hammer, yikes. The pictures are even more scary!

He just loves to scare me to death.


It’s getting close to me coming there to design the paint scheme with our painter.
While visiting I’m going to bury every hammer I can find and only give you a map after she is done. HA!

She is looking really sweet, excellent job buddy... thank you so much!!!
 
Top