Progress Continues.....
Progress Continues.....
Thanks for the compliments guys!
Well, we have made some more progress!
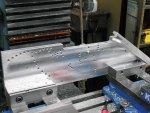
Tom Patterson stopped by yesterday to assist in the drilling of the rivet holes in the spars for the tail section.
It almost took longer to lay out all the drilling positions and make the fixtures than it did to design the parts themselves, but I think it was worth it.
The fixture holds all the parts at the correct angle so that the rivet hole is perpendicular to the surface. I refer to this fixture as the "Hornet constellation"
")
As I mentioned, I am having the 24 Ga aluminum skin laser cut with all of the rivet holes included. I'm getting excited to see how everything lines up.
Getting the drawings ready for laser cutting was a task in itself. I send out a lot of machine parts weekly for this same thing....shelf brackets, drip trays, belt guards, etc... these are usually pretty simple, (boxy, straight bends).. I can export from the CAD software, and they can take my files and load it into the laser and cut..no problem.
For this (somewhat) airfoil shape however, it gets a little trickier....
When you drill a round hole through a curved piece of sheet metal, and then lay it out into its flat pattern,you no longer have a round hole. The material gets compressed on one side and stretched on the other. In the cad file, you now have a series of many, many small line segments representing the perimeter of the hole (called a spline).
Now, most software for these lasers and such now days can pick up on this and still cut the hole (or a very close representation of it) no problem. But some times, there many be a small glitch in one of these splines (or a large group of them) and cause the laser to just ignore them all together. What you end up with is a part with only half as many holes in it as you wanted!
So, for these parts, I did not want to take any chances...I went and replaced every one of these splines with a true 1/8" circle. That took some time!!
I don't know if the laser-cut parts will be ready this Wednesday or next. (I am there every week) But, I have asked if I could be present during the cutting to possibly get some pictures or video....It would be some nice documentation to go along with my build log...(and to share here)
I have just a couple more parts to machine for the tail before we will be ready for assembly. I'm hoping we will be ready for our "riveting party" within a couple weeks.
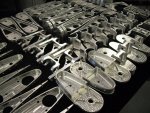
I've attached a picture of some more machined components for the tails...Remember now, the parts shown are for at least 3 full assemblies. A full completed tail assembly should come in at just over 14 pounds.
I know I showed the spars before, but I thought they looked a lot cooler now with the rivet holes included.
I also attached a couple videos showing Tom and myself drilling the spars yesterday. (I hope........this is my first attempt at posting a video)
This is fun!
Denis
YouTube - Rivet Hole Drilling_Front Vid.AVI
YouTube - Rivet Hole Drilling_Rear Vid.AVI