Wunderlich Rotor Brake

CLS447

Platinum Member
Joined
Oct 30, 2003
Messages
6,324
Location
Reading, PA
Aircraft
Air Command 503 & Air Command SxS /EJ2.5
Total Flight Time
Aprox 400 gyro
Just for sake of discussion.................

I think I know but.................What is the bolt for on the rotor brake ?
 

Attachments

  • IM000427.jpg
    IM000427.jpg
    124.4 KB · Views: 2
  • IM000428.jpg
    IM000428.jpg
    124.2 KB · Views: 2
  • IM000431.jpg
    IM000431.jpg
    125.3 KB · Views: 2
  • IM000432.jpg
    IM000432.jpg
    125.6 KB · Views: 2
Hi Chris,
The forward facing screw with jamb nut is to keep the brake from hanging down and interfering with the roll axis. It should be adjusted to keep the gap between the brake material and the pad to a minimum.

For some reason the screw may bee too close to the bottom of the torque tube. It is "OK" to redrill the hole above the original on these mis-matched units. I think the torque tube holes were later standardized on the Air Command head.
 
Thanks Tom ! I had to bend my bolt so it would work as intended. Now it is wearing a hole in the front of the torque tube.

So we both have mis matched units ? The hole is about as high as it can get on the TT.

What kind of TT were these designed to fit ?

I was thinking about redrilling the brake higher than the existing hole & installing a larger diameter bolt, to get it working like it should.

Have you changed them at all or is there a different one for the AC TT ??

I would like to see a picture of this brake on a MATCHED TT .

As you can see in the pictures, Larry's bolt clearly misses the end of the TT & hits the underside of it.

For 20 + years I have wondered why this was so.
 
Last edited:
BTW Tom, the new bronze upper bracket you sent me a while ago has been working great. I grease it regularly. I'll probably get another 20 years out of it !

Thanks for keeping the parts available & all that you do !

I was just wondering about that bolt this weekend & thought that I would bring it up for discussion.

I wouldn't know what to do without that rotor brake !
 
Does everyone else's stop bolt contact the front of the torque tube ?

Am I the only one that has wondered about that dang thing ???

Let's see some pics of how yours is adjusted ?

Won't this be a fun little project/ conversation ? Anyone ?
 
Rotor Brake

Rotor Brake

Hey hey hey,

FYI, This be the setup on my 447 (pardon the blur).

And, not to change the subject, but ,,,, My foot brake takes A LOT of pressure to stop the gyro. Does yours?? Should I be worried?? I'm thinking of relocating/straightening out the master cylinder so it is a stright heel push instead of off to the side. Thoughts??

Bill
Mach .06

(I hope the attachments made it. I don't know how to imbed the thumbnails like you did).

View attachment 74986

View attachment 74987

View attachment 74988
 
Last edited:
Bill !!!! Thanks for those pics ! Obviously your rotor brake is slightly different & allows the stop bolt to function correctly !

I am trying to see what the difference is ?

What is the piece of threaded rod in the plastic brake actuator for ? Will it function without it ?

About those wheel brakes........ I imagine that you have the plastic Azusa wheels with the thin brake rotors ?

Those brakes must be bled of all air to function well. I am still using the same brake pads that came with the machine back in the 80's.

I have the same brakes & they work good enough for most situations. They will stop the machine but will only hold her back to a certain RPM (3000 ?)

I have never found the need to go with a more expensive wheel / brake combo.

I should show you some pics of my other machine & other peoples. What they do is add a lever type of pedal that will increase the leverage on that master cylinder.

Most people use that same master cylinder but with different pedal types. I just use a firm heel push & sometimes use the "Flinstone" style brake with my other foot.

I will have to take some pics for you. Do you know the best way to bleed them brakes ?
 
Chris, it looks like you have enough room to drill and tap a new hole for your stop bolt to center it on your torque tube.

~~JAKE~~
 
Hey hey hey,

The threaded rod in the plastic brake actuator is an adjustment mechanism. It sets the point at which the brake engages the rotor when the joystick (cyclic) is pushed forward - the more threads showing, the sooner the rotor brake engages,,, but definitely off (down) when flying otherwise things get real interesting.

As far as the functioning without it, maybe, maybe not. It is a inter-relationship between the joystick relative position to the pilot (forward or back), and where the brake starts to contact the rotor. You have to play with it to get it to feel the way you want it.

On the brakes, yep, I too use the “Flintstone brake assist”. They are the original pads and Azusa wheels and rotors. Yes I would certainly appreciate the pics on how others have installed a lever to gain leverage. I really don’t want to reposition and align the master brake cylinder.

And no, I do not know how the bleed the brakes. I have looked and they do not bleed like a car system - no reservoir. So any hep would be appreciated.

I also saw your thread on the tail wheel. NEAT. I’m ordering mine later today. My only delay is the wife has to choose the color. How dare I fly something that is not color coordinated!

Bill
Mach .06
 
OK....bleeding the brakes......

First you need a pump style squirt can with a hose that fits tightly on the bleeder fitting.

Second, you have to use the red transmission fluid.

Get a good size squirt can. & a good (12") piece of hose. Now make sure you have a good fit on the end of the squirt tube.

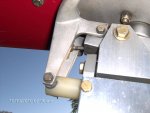
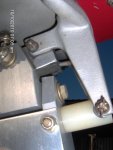
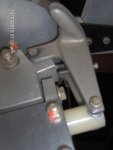
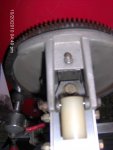
You will see that the bleeder fitting on the master cylinder is pointing down. This is not good because the air wants to stay in the master cylinder. By removing the bolt closest to the gyro seat, you can tilt the pedal down so the air moves to the bleeder fitting.

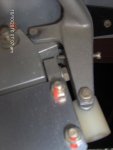
Now get your little wrench on the caliper bleeder. Loosen it a bit & then just snug it slightly.

2 people are good here.

Attach the squirt bottle to the caliber bleeder & open the master cylinder bleeder.

Have someone catch the fluid & check for air. Pump the fluid from the caliper to the master cylinder until all air is gone. Make sure that you are not introducing any air into the system.

Snug the master bleeder & then the caliper bleeder.

Now repeat for the other side.

Of course the idea is to get ALL the air from the sytem. The way the the master cylinder is sitting before you tilt it will always hold an air bubble. So tilting it is important !

One bubble & the system looses efficiency. Other than checking the pads & rotors this will make the brakes as good as they can be. They are not that bad.

Let me see if I can post some more info & hopefully others will add some things here.

Maybe you could do a search for brake bleeding on this forum.

I will get some pics of the levers that AC sent me for my 2 place.

Check this out.......http://hegar4.com/zc/index.php?main_page=index&cPath=95&zenid=9f3e1a8842befacb5180b23899e4fca4

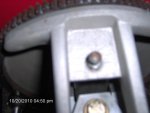
Hey, while you are at it ....replace those black rusty bolts that hold the master cylinder to the mounting bracket, with Stainless steel bolts & nylocks !!!!!
 
Last edited:
Jake, I will be trying to relocate that bolt soon. Thanks

Bill did you look at the Hegar website & see the bleeding kit & the levers for the Master cylinder?
 
Chris,
Yep I looked at all the lever types, and like you, I want to stay with the heel push setup. My hands get a little busy doing all the other stufffff and I don’t want to have a senior moment and push on the throttle thinking it was the brake - duh! I may move the current master cylinder over an inch or so to get a better angle on it, but first, the line bleed process. I have enough parts here in the garage to make the bleeder kit and Thanx again for the process.

And as part of the whole brake system (should I be starting a new thread here ???? :) ), I am investigating installing a stop valve in the main line so I can use it as a parking brake. I am currently searching for an appropriate valve. So far the best option is from Matco mfg - http://www.matcomfg.com/PARKINGBRAKEVALVESINGLESIDED-idv-3580-8.html. It’s nice and maybe the fallback, but I’m looking a little more friendly to the pocket book.

Bill
Mach .06
 
I took a look at the front of the brakes....should be an easy fix. I was just wondering why they were the way they are ?
 

Attachments

  • IM000457.jpg
    IM000457.jpg
    127.2 KB · Views: 1
  • IM000458.jpg
    IM000458.jpg
    124.2 KB · Views: 1
.......I am investigating installing a stop valve in the main line so I can use it as a parking brake. I am currently searching for an appropriate valve. So far the best option is from Matco mfg - http://www.matcomfg.com/PARKINGBRAKEVALVESINGLESIDED-idv-3580-8.html. It’s nice and maybe the fallback, but I’m looking a little more friendly to the pocket book.
Bill, what you are looking for is commonly known as a 'line lock'. Drag racers have used them for years but have since gone from manual actuated to solenoid ones. There was a time when the Jamar line lock valve was available from J.C. Whitney. But, I did a quick google and see it mentioned that they don't sell it anymore.

Another google found where a Jamar system for ATV parking brakes is available but the system is more expensive than the Matco. If you could just buy the valve (it used to sell for $25 - $35) then it would probably work for you. Carl Schneider used one on his Carlanator for awhile but I believe he started having leakage problems. I have one that I hope to use.

Another possibility is to use a Nupro toggle or quarter turn ball valve. They come with 1/8" or 1/4" tube or female NPT ends. I'm not sure about using the toggle but the 1/4 turn would work just fine. I suspect the cost is in the $40 - $60 range. These are quality valves that are used mostly in pertro/chemical applications, mostly labs. The thing to pay attention to is the seal material being used with brake fluid. The PEEK seals would probably work fine. Got any friends at a chem plant or refinery?!! Here is a link that shows the valves. http://www.sisweb.com/catalog/08/D57.pdf Swagelok, Whitey and Nupro are all from the same company.
 
Last edited:
Hey Dean,

Thanx for the info on “line valves” and URL. I have never heard of the term so I have been searching for “hydraulic valves” for several days and found nothing that would work. I will be scopeing out the manual quarter turn ball setup. We are having a major storm (4"-5" rain & 40 knot winds) here in Northen CA so tis a good day to surf the net and find a valve. As far a brake fluid, the AC uses ATF so I don’t think that will be an issue on the valve seals. I have never measured the PSI on the line so I may do that today to get a max pressure for the valve.

And as a change of subject, I also scoped out “Why Dean doesn't fly” and as an FYI, my dad had a cochlear implant @ 15 years ago and would be lost without it. He raced hydroplanes when he was young and foolish and back then, he tuned the carbs by sticking his head next to the exhaust at wfo - 12-14K rpm. Wonder why he has a problem??? And from what I understand, the technology has improved since then.

Thanx again
Bill :)
 
Flying shoe

Flying shoe

Gyroplane :

I had my shoe come off my rotorbrake the other day, I was wondering what do I use to put it back on with.....?:wacko:
 
Top