Skeeter Jr.

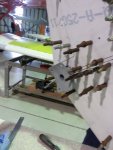
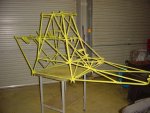
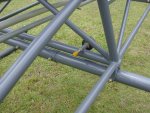
I would say any "zinc-rich" 2-part, epoxy primer would be the best.
I'd stay away from spray-can stuff, or any quick dry lacquer unless your goal is to prevent surface rust in the very short term.

PPG DP-75LF is the Cad-Dil-Lac product but it has a red oxide color.
 
Final assembly has now at last begun!!

I've been a busy bee these last couple of days, getting the basics together. The frame came back from media blasting, with a light coat of zinc phosphate primer on it. I opted to paint the fixed frame parts a machinery grey, with the moveable chrome moly parts painted aluminium, to match the nickel plated and anodised parts. I currently have an old transmission fitted, I will paint the one I'm rebuilding a spinnaker blue.

The foam tubing around the skid tubes are a temporary thing, to not scratch the skids while I'm building.

From here on, the next task is connecting up the throttle to the governor actuator and correlator. I'll then get the engine installed again, and couple up the drive system. After that, the target is to install the tailboom and TR transmission. Electrics and plumbing go in next. It's all coming together now.

More pictures to follow soon.
 

Attachments

  • Skeeter Jr build coming along.jpg
    Skeeter Jr build coming along.jpg
    143.5 KB · Views: 13
  • Returned from media blasting.jpg
    Returned from media blasting.jpg
    136.2 KB · Views: 12
  • Frame Pressure Valve.jpg
    Frame Pressure Valve.jpg
    143.5 KB · Views: 12
  • Control System.jpg
    Control System.jpg
    142.9 KB · Views: 14
  • Collective and Throttle Friction.jpg
    Collective and Throttle Friction.jpg
    143.2 KB · Views: 13
  • 5-point Harness.jpg
    5-point Harness.jpg
    140.4 KB · Views: 13
  • Lockable Inertia Reel System.jpg
    Lockable Inertia Reel System.jpg
    140.5 KB · Views: 12
  • Cyclic Friction.jpg
    Cyclic Friction.jpg
    142.8 KB · Views: 12
.. some more pictures.
 

Attachments

  • Governor Actuator Installation.jpg
    Governor Actuator Installation.jpg
    142.2 KB · Views: 9
  • Ground Handling Wheels.jpg
    Ground Handling Wheels.jpg
    144.2 KB · Views: 10
  • Throttle Correlator Mixing.jpg
    Throttle Correlator Mixing.jpg
    144.6 KB · Views: 11
  • Governor Actuator.jpg
    Governor Actuator.jpg
    142.4 KB · Views: 12
  • Skeeter Jr.jpg
    Skeeter Jr.jpg
    143.2 KB · Views: 10
  • Uncomplete Console.jpg
    Uncomplete Console.jpg
    142.9 KB · Views: 10
That sure look great Francois, glad to see it progressing.

I like the friction set up for Collective and Cyclic, is that using phenolic block?

I re-read and did not see what model engine you will be using?

Ken
 
Hi Ken,

Yes, my friction setup is made up of arms clamped between phenolic blocks. I have to give credit where credit is due, they are a copy of the Dennis Fetters's setup implemented in the Mini-500.

I'm using a Yamaha 130FI engine to power my helicopter, I've attached some pictures taken during the prototyping.

I've discovered an old scanned copy of the Pop Emigh booklet you asked about. I'll e-mail it to you now, let me know which pages are unreadable. I'll rescan those.

Cheers,

Francois
 

Attachments

  • Yamaha to Mini-500 Clutch Support2.JPG
    Yamaha to Mini-500 Clutch Support2.JPG
    34 KB · Views: 18
  • DSC00070.JPG
    DSC00070.JPG
    42.8 KB · Views: 18
  • DSC00074.JPG
    DSC00074.JPG
    44.2 KB · Views: 18
  • DSC00075.JPG
    DSC00075.JPG
    40.7 KB · Views: 18
  • DSC00077.JPG
    DSC00077.JPG
    35.2 KB · Views: 18
  • DSC01448.jpg
    DSC01448.jpg
    131.4 KB · Views: 19
  • DSC01190.jpg
    DSC01190.jpg
    136.8 KB · Views: 19
  • DSC01195.jpg
    DSC01195.jpg
    131.7 KB · Views: 21
Last edited:
That is fantastic on the Emigh booklet, thank you.


The Yamaha 130FI ought to make Skeeter jr a really fun flying and excitingly powerful little helicopter.

Curious, you do the welding on the tubing?
I guess if there is anything on this planet I am good at it is gas welding, literally have probably welded miles of it.
The welds look good!


Ken
 
Last edited:
Ken, the booklet and calculator sent to the e-mail you provided.

Yes, I did the TIG welding myself. Self-taught under supervision of our aircraft welder at work. It was a damn steep learning curve!! The little things such as not setting the down slope and post gas flow correctly came back to bite me. When pressurising the frame, I must have repaired 20 little pinhole craters where the welds stopped. It was there where I did not slope down the current, and did not flow the Argon until the weldpool solidified properly. So we learn.......

Cheers,

Francois
 
Francois,
I know you tried before and It never arrived, I'll PM you now and include my isp email address.
The email address provided is good , not sure what goes wrong.

Thanks again.

Ken
 
It came in finally Francois, hope you get this in time.

Ken
 
Lookin' good Francois. Your foam skid protectors reminded me of a set of skid-savers I read about on another forum. A guy took a piece of PVC the same length and inside diameter to match-up to his skids, split it in half, and secured it to the bottom of each skid, like a full length skid shoe. Wether it's a good idea or bad is up to you, just something to consider.

You'll have to excuse my ignorance on the next question. Why the interest in zinc rich primer on the chrome molly? This is something I need to know as I'll be painting my frame soon. Maybe you paint gurus will be willing to share some experience.
 
Hi Barney,

My foam protectors are a temporary thing while I drag it around the workshop. I don't want to wear the bottoms down on the cement floor, without even flying a bit! I am sorry I did not purchase thicker walled tubing for my skids.

The yellow and green zinc primers have been the aviation industry corrosion resistant self-etching primer standard for eons. They offer a maximum adhesion to bare metal. It's a sort of chemical bond to the bare base metal. Historically, zinc chromate was always used, but this has been replaced with a more eco friendlier zinc phosphate primer.

See the handy spray can aviation primer products from Tempo, P/N A-701 and A-702. http://www.aircraftspruce.com/pages/cs/primers/zinc.php

Cheers,

Francois
 
Hi Francois,

I am about to order some chromolly tube, and without going through all the math, can you tell me what wall thickness's you are using?
I didn't realize there are so many choices.

Your project is looking great! Can't wait to see more.
I will start a build thread once I get some parts made.

Cheers Cam.
 
Hi Cam,

Most of it is 0.035" wall. The 4 main vertical tubes are a bit beefier at 0.049" wall, the transmission mounting tubes are 0.058" wall thickness.

You can't go wrong to pressurize your frame in flight. That way, a frame tubing crack will immediately be detected.

Looking forward to your pictures, or seeing what you are building this time.

Cheers,

Francois
 
Thanks for that.

I have most of a CH-7 here with the pressurized frame. Great, simple idea!

Cheers Cam.
 
Hi Cam,

Are you keeping it with the fully enclosed bubble canopy? Look what this Chinese guy did to his.

Cheers,

Francois
 

Attachments

  • Open Cabin Angel.jpg
    Open Cabin Angel.jpg
    61.8 KB · Views: 6
No, the CH-7 isn't mine. It's being stored here for me to drool over.

Great machine to get ideas off.

I haven't seen that heli before. looks like he would be missing a fair it of forward/down view. Looks nice though.

Cheers cam.
 
Hi Cam,

I have just last week started back up on my Skeeter Jr.

I remade the tailboom support collar, I was not happy with the previous design. It is in it's final stages of prepping, before painting it this weekend.

I this week made the horizontal and vertical stabilizer to tailboom attachment. I'm not attaching those to the tail transmission, as in the Mini-500. If you whack the standard Mini-500 tail into the ground, the attachment bolts strip out of the casing. There are no spare casings lying around any more.

I have also finally decided on my fuel tank configuration. It went from spun aluminum tanks, ala Bell-47 style, to 2 good quality plastic containers strapped to the side, ala the original CH-6. They are strapped onto 2 frames, left and right, right on the CG line. I have quick disconnect couplings on them, it will be easy to go and refill the tanks, or carry spares on the back of the ute.

I hope to finish painting my tailboom this weekend, and post pictures of my progress.

Cheers,

Francois
 
Not too much progress to report. I have started the sheetmetal work on the vertical and horizontal stabilisers.

Cheers,

Francois
 

Attachments

  • Skin.jpg
    Skin.jpg
    58.3 KB · Views: 11
  • Stab Frame.jpg
    Stab Frame.jpg
    46.4 KB · Views: 11
  • Vert Stab.jpg
    Vert Stab.jpg
    45.6 KB · Views: 11
Slowly getting there....
 

Attachments

  • Boom Support Mount.jpg
    Boom Support Mount.jpg
    26.5 KB · Views: 8
  • Stabiliser Mount.jpg
    Stabiliser Mount.jpg
    48.2 KB · Views: 8
  • Fin Ribs.jpg
    Fin Ribs.jpg
    63.2 KB · Views: 8
  • Stabilisers.jpg
    Stabilisers.jpg
    62.8 KB · Views: 8
Top