Skeeter Jr.

HobbyCAD

Homebuilt Heli Enthusiast
Joined
Jul 8, 2008
Messages
1,663
Location
Hervey Bay, QLD, Australia
Hi There all,

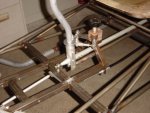
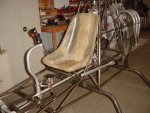
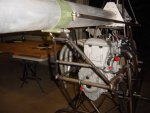
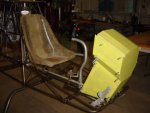
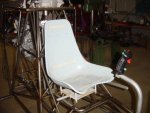
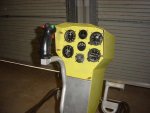
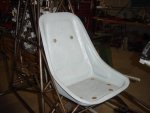
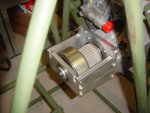
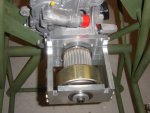
Well, for the last couple of months, I have been tinkering away at my Skeeter Jr. helicopter. I got my inspiration from the first time I saw a Cicare CH-6. I wanted one. I got involved in all types of projects back in the late 80's/early 90's, even landed up at Joel Levin's (of Vortech fame) place near Baltimore. I wanted to start on a CH-4, but soon the Mini-500 came along. I could not afford one, so a couple of years went by, with me sidetracked by compeditive match-racing (sailing). Eventually, I started off to from first principals, designing my Skeeter. I decided to "steal" some Mini-500 components, ones that had nothing to do with the negative track record the machine has been stigmatised with. Today, the Skeeter Jr. airframe is just about ready to be sandblasted, so before I start disassembling, I thought I'll snap some pictures, and introduce her to the outside world. Excuse the slight surface rust appearing, and the oily surfaces, but it's a battle to keep the frame from corroding, while it's still unprimed.

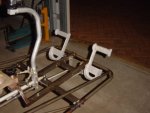
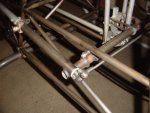
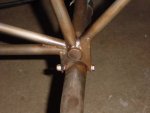
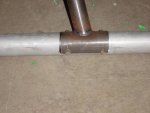
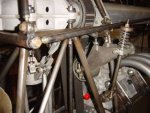
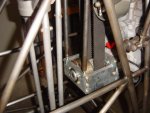
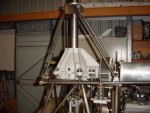
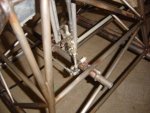
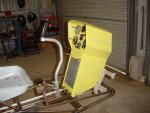
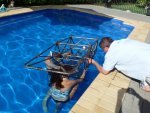
At first, a couple of pictures of the frame, and the way I implemented the anti-torque pedals. Remember, it's an open frame machine.
 

Attachments

  • DSC00067.JPG
    DSC00067.JPG
    34.3 KB · Views: 38
  • DSC00068.JPG
    DSC00068.JPG
    42 KB · Views: 40
  • DSC00070.JPG
    DSC00070.JPG
    42.8 KB · Views: 40
  • DSC00026.jpg
    DSC00026.jpg
    41.4 KB · Views: 44
  • DSC00071.JPG
    DSC00071.JPG
    38 KB · Views: 42
  • DSC00072.JPG
    DSC00072.JPG
    23.2 KB · Views: 40
  • DSC00073.JPG
    DSC00073.JPG
    26.9 KB · Views: 39
  • DSC00074.JPG
    DSC00074.JPG
    44.2 KB · Views: 38
Some more of the airframe, the correlator, and sheetmetal work taking shape.
 

Attachments

  • DSC00075.JPG
    DSC00075.JPG
    40.7 KB · Views: 30
  • DSC00076.JPG
    DSC00076.JPG
    42 KB · Views: 39
  • DSC00077.JPG
    DSC00077.JPG
    35.2 KB · Views: 35
  • DSC00078.JPG
    DSC00078.JPG
    41.1 KB · Views: 39
  • DSC00079.JPG
    DSC00079.JPG
    31 KB · Views: 35
  • DSC00080.JPG
    DSC00080.JPG
    33.9 KB · Views: 28
Hobbycad- Its one thing to put a kit together of soneone elses design, but designing your own is another level. Very impressive. Its nice to see what you have been up to. Stan
 
Don, great minds think alike, and fools never differ .....

Here is an aluminium seat I salvaged from a De-Havilland Drover. It was my first choice, but seemed a sin to cut such a historic part to bits, to make it fit my seat mounting. Then I thought, once upholstered, most of it is in any case, hidden away. I then took the Mini-500 seat, made a plug of it, then made up another single layer fibreglass seat, cut it in half, tapered it to fit my frame taper, and joined the 2 together. I'm now to layer in some Devinnicell, glass it up once or twice to strengthen it up, and I'll have a bomber seat look-alike. Once it it upholstered, hopefully it will look the part.

But I agree, the attached seats on e-Bay look fantastic.... Have you seen the price??
 

Attachments

  • Seat1.jpg
    Seat1.jpg
    15.9 KB · Views: 15
  • Seat2.jpg
    Seat2.jpg
    18.3 KB · Views: 14
  • DSC00081.JPG
    DSC00081.JPG
    39.4 KB · Views: 15
Slow Progress

Slow Progress

I've taken advantage of the X-mas break, and did some more tinkering on my Skeeter Jr. I just about completed the instrument console. Anyone spot the resemblance to the CH-4 console design?

I also made a copy of my original Mini-500 seat, hacked it up to suit my frame, made a mold, and produced my seat. It's ready to go to the upholsterer now.
 

Attachments

  • DSC00084.jpg
    DSC00084.jpg
    48.2 KB · Views: 6
  • DSC00085.jpg
    DSC00085.jpg
    58.7 KB · Views: 6
  • DSC00086.jpg
    DSC00086.jpg
    45.9 KB · Views: 6
HobbyCAD
I think it is a Impressive work you have done !!! Did you made CAD-model of the frame (SW) and did you fabricate a welding fixture for the frame? I notice that you use a lots of ball-joints it is a heritage from the Mini 500 or it is your own design ?
 
Hardly any progress made during the last couple of months. Work has kept me busy. At least I tried my hand at seat upholstery. Not the best of quality, but it looks good from a distance.

I don't remember showing off my Yamaha to Mini-500 clutch adaption. I have since upgraded to 4 x larger diameter bolts that attach the rear plate to the Yamaha engine. I also inserted helicoils into the Yamaha engine casing, to beef up support.
 

Attachments

  • Yamaha to Mini-500 Clutch Support1.JPG
    Yamaha to Mini-500 Clutch Support1.JPG
    31.5 KB · Views: 23
  • Yamaha to Mini-500 Clutch Support3.JPG
    Yamaha to Mini-500 Clutch Support3.JPG
    36 KB · Views: 23
  • DSC00243.JPG
    DSC00243.JPG
    13.1 KB · Views: 23
Last edited:
Hey hobby,

Is the clutch from a mini 500?

What rpm does it come in at?

And your project looks great, all the best with that.

kingo.
 
nice fabrication/assembly..............
 
Hobbycad,
Finding any time for Skeeter Jr?

Looking real good so far.
 
After being on the back-burner for a couple of months, the Skeeter Jr project has kicked off again. I've completed the frame, all bracketry have been added, it's done. It's booked in for media blasting on the 7th, I have spent the last 2 days checking my welds. I pressurised it to 1 Bar, and checked each joint with soapy water. Of course, half a dozen pinholes showed up. A quick clean and re-weld, followed by an overnight at 2 Bar. This morning, it lost 1/2 Bar, so there were still some pinholes somewhere. I jacked up the pressure to 3 Bar, and sure as hell, micro pin-holes were detected. I fixed those today, but then I decided on the ultimate test, 4 Bar followed by a dunking in the pool !! The kids had a ball snorkelling and finding those micro stream of bubbles. 5 more micro pinholes showed up, I've just reworked those. I now have the frame under pressure, I'm holding thumbs that I have the same pressure reading in the morning.
 

Attachments

  • P1000864.jpg
    P1000864.jpg
    70.9 KB · Views: 21
  • P1000863.jpg
    P1000863.jpg
    65.6 KB · Views: 22
Do you intend to pressurize the frame like the CH-7 did, so if cracks happen in flight you'll know it immediately?
 
Hi Bryan,

Yes I do, exactly like they did in the old French Allouette helicopter frames. I'm not only putting in a dial indicator for use during pre-flight, but also installing a pressure switch wired up to a warning light.

... and a quick peep in the shed this morning showed 4 Bar on the gauge still inside, thus my frame holds its pressure !!!

Now it's blasting, priming and painting. My mind tells me that the yellow zinc phosphate aviation primer is best, but what is wrong with using plain old red oxide primer on the chrome moly?

For the topcoat, I'll 2-pack it. I have always liked the bluish turquoise colour the Soviets use on their airframe interiors, reminds me of the captured equipment I used to operate back in my military days. Being an open frame helicopter, all will be visible, a bluish turquoise helicopter might look strange. Maybe I should only make the transmissions that colour. How about a matt silver-grey frame, to match the aluminium parts?

Anyone care to comment on a frame colour?

Cheers,

Francois

Medium-dark gray on all airframe parts, and spinicer-blue on the casted or large parts, and plain-anodizing on the machined aluminum parts after a vibratory finish. My study showed that these colors make the frame look strong, and the heavy bulky parts look light in weight. Blades white with black tips.
 
Hi Dennis,

I have had the original Spinnaker Blue already colour matched, I'm ready with that. I'm going to see if I can match the dull vibratory matt nickel plating colour, and paint my frame with that. The tailboom and console is still the open question.

Cheers,

Francois
 
Hey Francois, how about olive drab and flat black. No...Wait...That's what I'm doing with mine. Never mind.

Like you, I would like to hear some opinions (with explanation please) on the primer. For example, some Rotorway folks like powder-coating for the frame, others say that you can't spot cracks as early and prefer paint. I've become fairly proficient with a rattle-can but would be interested in hearing the advantages, and disadvantages, of high tech, high dollar finishes.
 
Hi Barney,

For my project, a first of type, one cannot be 100% sure the frame design is final, so with this uncertainty, powder coating is the wrong choice. I might have to add a bracket, move a tube, whatever, so rework and touch-up with 2-pack is the way to go. Anyway, I think powder coating is an overkill.

It would be good to hear some comments on primer paints for chrome moly, is it zinc phosphate or red oxide.

Cheers,

Francois
 
Last edited:
Top