Little Wing Boosters Questions, Comments and related info

Hi Spence,

Good to hear from you. I didn't go anywhere - I kept checking in often and tried to avoid stuff. I knew you would be getting closer but wondered because I haven't seen any updates for a while.

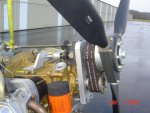
Umm to try to answer your questions. The prop came from Valley Eng. I was out there and they said they would work with me to find a prop that will work. I have the 1.6/1 redrive and they say "ideal" is 72" for this ratio. It does not mean that I could not go 76-80 but this is what they recomend. I am assuming then that you have a 2.0/1 drive because that, I think is the ratio for a bigger prop. I bought the engine/redrive used and pulled the parts off it to put on my "good" engine, so that is the ratio I got.

I think with the same concerns that you mentioned about pulling the heck out of a prop and only going 40-50 mph is why I am testing out the more agressive pitched prop because it should ensure that I am not just letting the engine run up in a low gear so to speak.

Also I don't have the newer redrive that has the idler arm for higher hp engines. I figured instead of going to the max size prop, I would just go for something they determined would give me at least 350 thrust and if my engine pulled better...or not..... I could fly reliably without lugging the engine or worrying about engine oil temps creeping up... I am just thrilled that we could interchange parts that we were told was not possible.

I can change the prop with them to find what is suitable. I am sure I could go/try a larger prop if it will take it. I have large cub wheels on the single place and it makes a big difference. They were very kind and hospitable just as you said. They showed me a few props that I could try. I just went for the aggressive pitch that would ensure that I wasn't just going to pull good in a "high reving gear" so that I had potential for a higher cruise speed. I am kinda trying to avoid that high pull/slow go you and Tony talk about.

I'll be watching to see what you can do. I would lend you my thrust tester but I am kinda using it right now too.

I know what you mean about the wind. Last fall I was leaning into the cockpit while running a test. I turned to my right to look towards the rear. The wind ripped my glasses off my face and it took me a while to find them. I think they were around 30 feet away. I had to shut down the engine, walk around the front of the plane and go get my old glasses. I was worried that I was going to step on them because I wasn't seeing them anywhere near the area I thought they would be. But even at the begginings of my thrust tests it always felt like a lot of wind and it was, but not enough. I finished adding the remote oil filter, welding up the intake and remounting the coil. All I need is to get the low resistance spark plug wires to run the new pertronix ignition system. Then we will know if my glasses will shoot 40 feet or 50. ;):plane:
 
Last edited:
Hi Spence and James

Have a question for both of you. Have seen several VW engines torn down by a friend of mine that used to be into dune buggys, and am familiar with the front bearing of the VW and how small it is.

Now ALL of the torque that the engine puts out is going to have to transfer at 90 degree angle from the crankshaft pully/sprocket up to the prop pully/sprocket in the form of a radial load and on these modified engines that can be quite a bit of torque. Originally this bearing was made to handle the radial load of the alternator, cooling blower, smoog pump and maybe a air conditioner compressor, which I don't think this would be the full torque load.

What has GP or Valley had to say about this radial load factor, I would sure feel better if GP would make a "FORCE ONE" pulley or sprocket like they do the "FORCE ONE" prop hub with the much larger bearing but at the moment if I read correctly they specifically state that this re-drive will work ONLY ON THE STANDARD CRANKSHAFT. I hope this bearing is not a source of trouble since I too am looking to usse this arrangement.

Tony
 
Hi Joe

It looks like the re-drive mounting plate may have a bearing mounted in it. If so then this would be working like the old AMAX set up on the Subaru EA-81 which takes the radial load, alignment must be exact though.

Tony
 
Hi Tony,

I think you have missed what I was excited about. I mentioned a couple times how I took the redrive off the donor engine and put it on the one that already flew. I was very excited because all we had to do is turn the pully shaft down .030 and remove our old prop hub that IS a force one hub and slipped it right in. Yep ! It has the force one hub and it does fit even though I have been led to believe that I had a case that would not work because my case was no longer standard. Aren't you REALLY happy like me now ? I know mine is not the latest series 3 system but for me it fit my needs exactly. See what happens when you let someone tell you it can't be done ;)

I learned a lot about belts this week. One of which is that if the belt is too loose it is worse than too tight. Information on proper tightness is sparse. Replacement belts are 23.00 apiece X 3. Old belts have been discontinued but replaced by new ones that are Carbon fiber and much stronger. Feeling better yet? :)

You are right about how much load is on a belt redrive. I found this article interesting: (read end part of point 3 especially) : http://www.epi-eng.com/rotorway_helicopter/rotor_drive_system/gates_belt_issues.htm
 
Last edited:
Hey Hey James

Yes sir, I understand now, that is great news, to bad that GP does'nt offer that arrangement.

Tony
 
Tony,

You could piece this together as I did. You would have to do a little of this or that but knowing that it does work would make it worth it.

What I would do is call Larry over at Valley and tell them you would like the old drive. Heck you are only a state away from them and they are VERY helpful. Gates has the sprocket gears for their belts and we can easily figure out the ratio. You could get an engine from great plains that has the force one hub installed and order it without the prop hub or at least order the machining(cost???) and the prop bearing (80.00). If Larry knows what you are piecing together and we made it work I am sure you can do it....

I have been dicouraged by all I research and the phone calls to people trying to figure out this problem. Once I resigned myself to swapping engines and actually started pulling the one apart we figured out that it was possible with minimal machining.

I still have the donor engine with the machining done. I wasn't too happy to find they had tried to JB weld in one of the 4 bolt engine mounts. However we are fixing that. I was taking the engine apart to inspect and then noticed this. The case had some excellent welding of magnesium done on it either to strengthen or fix it but I could see that the split seams had been treated a bit rough.

You are not suppossed to use a screwdriver to split the case. It didn't seem to be leaking and from what I heard they have only run this engine a few hours or less in an airboat. It has the diel accessory case, starter, motor mount bushings, electronic ignition and bigger crank/cylinders for a 2180. I pulled it apart down short of splitting the case when I realized about the interchangability of the main part I wanted - The pully off the main shaft. Now I have to decide what to do with this engine. Either put it all back together and save it for parts or sell it.
I thought I needed a whole new engine "standard" as you mentioned and was surprised to find all this out. I would have bought the redrive years ago when it was the current model and all this would have worked out without having to buy another engine.
 
Just one for the "gang". Andy had his long range tanks on when we took this. Fiveboy was in my back seat and he did the "honors".
 

Attachments

  • Andy over the fairway.jpg
    Andy over the fairway.jpg
    138.4 KB · Views: 2
Last edited:
James

While you were working with Larry at Valley, did he mention any reasons why "they'" had not pursued the "force one" style arrangement on there engines or is it that they use the GP engines almost entirely for their build up. I know that in their promo's they strongly recommend the GP line.

I know from experience there would be quite a initial expense to tool up to make the "force One" style sprocket /pully but I think it would prove out a good investment. When I use to do the Subaru direct drive conversions the machine shop where I had the hubs made required a minimum of 10 hubs at a time, fortunately the shop owner was a personal friend of mine and made me a deal and cut a cnc tape for a one time modest fee and after that it was just time and materials,

I have had dealings with the companies that make sprockets and pulleys and they will usually really work with you when it comes to bore sizes and keyways but these all come from the same basic casting or forging and do not require a special size in this dimention. A poly-V pulley on the other hand could be turned from bar stock on cnc while the cog sprocket would require a special forging (very expensive). I don't know if GP is now using the poly-V set up or not, my catalog is several years old, if they are then perhaps a few request or nquires might inspire them to make some of the "force one" pulleys up on a trial basis, I know I would pay $200 or $300 extra if it was available.

Did you use the "neck" from the Force One" prop hub for the bearing surface and then add the cog belt sprocket where the hub would have been.

Tony
 
Hi Tony,

It is a cog belt. It is made by Gates. It isn't just a round tooth belt but actually flattened a bit on the top of the teeth. Doing a search on Gates I found charts, pully sizes and info on belts. My impression is that for power these synchronous drives are the way to go. These polychain belts have charts and info that is helpful regarding what size belts to use, ratio and tensioning. I think they are still using poly chains but added the tensioner. I think they would make a few pieces for you that they used to supply as standard. What I got from them initially is that they didn't want to R and D a new system because it was not worth their time....

Here is a couple links I have found helpful.

http://www.hoverhawk.com/polychain.pdf
http://www.epi-eng.com/rotorway_helicopter/rotor_drive_system/gates_belt_issues.htm

Anyway, regarding the switch... I pulled a hub attatched on the donor engine. It had a similiarly mounted force one type bearing. The difference was in how they attatched the seal. It was different but same principle.
The prop hub was removed from my currently installed motor and after machining the pully that had almost the same size shaft (neck)welded to it by taking .030 off it...... it then was small enough to slide into the force one bearing. The point is that the bearing was the same but different manufacture so it was slightly different fit.

No... I didn't ask why they did anything. I went that way to get the engine with the redrive. Then, after finding out the prop he had was traded in so he could put it on an airboat...but said they were working with Valley Eng. with the prop... I thought I better go and see them. It was almost 3 hours backtracking because I was going to drive the extra few hours to go see my wife's grandmother and father in Whichita but the blade he had looked poor and I wanted to see if they could somehow set me up. Like Spencer had said. These people were awesome. They appreciated that I thought the blade was bad and worked out a very fair deal with me and told me they would swap other ones until I find what I needed. I figured that was fair and headed out.

They felt the 1.6 drive was 72 inch ideal and I will be talking to them soon and now that I know what charts they studied from gates they did their research on this. Basically they figured the ratio, the belt width and size and then made the bracket and the prop gear to make it all work.

I broke 3 belts when I tried to use their directions of pushing VERY hard on the belts with thumbpressure... which isnt a real measurment. The mikuni started coughing and I pumped the throttle and they broke. Talking to Larry at Valley he said yep... belt too loose which is hard to believe. He said he had 3 used belts for me and all he asked was my address.

Here I was worried about breaking belts everytime I start a cold engine and he says he'll dig some belts out n/c and send them to me? I then found the carbon fiber ones which I will install after I play with the older weaker ones and see if I have any problems. I think we'll be fine and when I put the stronger ones on there... all the better.

Isn't that cool though? I bought the engine used, traded a prop with them and they are sending me belts to get me up and running? Yea, they are good guys.... same kinda stuff you find in gyro community... I didn't get to tell him what we did or ask him why they changed design but I know they could set you up. Hope this answers your questions and let's you know how friendly and sincere they are. jtm
 
Last edited:
Chris Thanks for the cool shot ! Isn't that so pretty? Must have been fun flying along with something that historic. So many things from the past to look back at in wonderment. Things like Amelia, Charles, Spads, Sopwiths and then there are things happening now that will someday be thought of in the same way as time keeps slipping away. That must have been fun !
 
Hey Richard Lidke

How are things going on your Little Wing, will it be at Mentone this year?

Tony
 
Hi Chris,

I notice in the picture you supplied and in the latest YouTube Video of "Woodstock", Andy is cruising with a fair amount of right rudder, and the fuselage slightly canted to the left (not level). Understandabally, this is because of engine torque and "P" factor.

Both Kellet, Pitcarin, and Cierva used assymetrical horizontal stabilizers (either with different amounts of angle of incidence between both sides of the HS, or using an inverted airfoil on one side and a right-side-up airfoil on the opposite) to counter the rolling effect of engine torque. I'm sure they all used an offset thrustline to also correct for "P" factor too.

I bet that the Little Wing could also benefit from these prevouisly mentioned methods.

What do you think?

Wayne
 
Ron Herron has in the past mentioned placing the main wheels of a LW on scales and adjusting tailplane differential incidence for equal readings to balance prop torque.
 
Chuck you are right and he told us about that. We made the last 4 inches of the tail hinged so it could be adjusted up and down but once set we added trim so that they both would move up and down together for pitch trim.

I think that Ron has that on his radial machine... can't remember. I think it was only a small amount maybe 1/2 inch up on one and 1/2 down off center on the other he told us we would need...
 
WHY,

The radial loads should not be that much of a factor, as the RPMs should be fairly constant.

Also, on my 2276, as opposed to James' 2180, I have a sand seal (nose of case was opened for a sand seal) which has a larger surface area to help distribute the load. In addition, the stock galley oil plug was removed (originally designed to limit the oil supply to the #4 bearing) to increase oil flow (as per Great Plains instructions). If this redrive set up had inherent problems, I'm sure we would have seen them by now. There are a BUNCH of redrives like this - Valley Engineering as well on the WWI replica aircraft flying VW's)

As to the Polychain GT-2 belts, which I can still find around here, Larry at Great Plains says thay are designed to last for about a year of flight or 150 hrs of operation. so far, have not had any issues with my belts. I use the Larry Smith tensioning method -good and tight, so that you can't push one belt past the others - and there is no sign of wear or damage to date. At $72 for 150 hrs, that's less than $.50 a flight hour...
 
Hey Spencer, did you run some rpm/thrust numbers yet? Are you running one or two belts?

I grabbed a few photos with my camera phone as I was thinking about adding cabin heat to the single place. Thought I would post them before I lost them :)
 

Attachments

  • Photo_092510_001.jpg
    Photo_092510_001.jpg
    97.5 KB · Views: 3
  • Photo_092510_002.jpg
    Photo_092510_002.jpg
    96.9 KB · Views: 3
  • Photo_092510_003.jpg
    Photo_092510_003.jpg
    98 KB · Views: 3
No Title

Stopped in here for mini update and check in here. Last summer came and went poof.--- At least I finally got to have a little fun. Built a cool 35 hp catamaran while learning to work with alluminum. Took one of our sailboats on a nearly 100 mile trip up through lakes and rivers, a lock into Lake Huron and sailed to St Ignace and Macinac Island for a few days. Working so hard the last few years I really appreciated this.

Still Gotta save up for a taller pole barn than we expected..... the straight floats are 12.2', 1140l lbs design./ 42 lbs each without braces. 7 sealed compartments (1 with latch ). Unsure what the exchange weight will be when we swap gear but looks very favorable.

They are a one, okay 2 off design similar to the design of whipline floats. Doesn't have flip up rudders yet. We have the aerodynamic braces but need to figure out these things when we hopefully resume building in Indiana soon..... Actual floats Photographed and digitally painted into this conceptual photo I made. However, the Floats are ready now to be painted and mounted as per photo..... The background photo used for this photo was taken of same LW plane parked downtown while in tow of a VW.

We are gathering info regarding balancing cg of floats and aircraft. We'll get her done sometime this spring at engineer friend's shop in Indiana . Looks like I will be resuming the trips down there to work again when he says it is warm enough for us to go out in shop. Hopefully we'll bring her home whenever I can get something to store her in. Well, that is where we are at.... holding on to our dreams and directions......

I didn't post this in my Single Place thread yet because I try to keep it basically as a sort of builder's diary of progress without questions or comments. In my search for more info regarding gyros on floats, I am encouraged by the videos that I am finding and I am happy that my airframe already had the per plans float brackets installed for this possibility.
 

Attachments

  • photo131476.jpg
    photo131476.jpg
    42 KB · Views: 6
Top