Kolibri's Korner -- a "blog" by a new RAF owner

Kolibri;n1121273 said:
RAFSA owner Eben Mocke Snr walked into a prop last month and lost an arm.

This incident is a reminder to us all to pay very careful attention while working on a running engine.
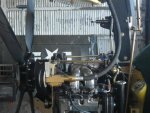
That is horrible ! Best wishes to him & his family ! Is he going to be OK ?
 
For those with (or considering) Sport Copter rotor parts on the RAF2000, I've composed a handy guide to help.
SC rotors fly very differently than RAF's, and trim forces will depend on which rotorhead you're using.

Kolibri's tips on adding Sport Copter rotors to the RAF2000

https://www.rotaryforum.com/forum/k...-on-adding-sport-copter-rotors-to-the-raf2000

For two years and 125+ hours I've greatly enjoyed my total Sport Copter upgrade (blades/hub bar/rotorhead, mast plates, and 4-way air-trim).
It's not an inexpensive upgrade, but nothing of high-quality ever is.

Safe flying!
Kolibri
 
The RAF PSRU back plate has been known to crack at/near one of the horseshoe bolt holes.
Mine did. I had my expert TIG welder add some material there, though he didn't think it would hold up for long.
He was right, as I found a reoccurring crack just 25 hours later.
(I don't order from RAFSA, so I didn't even bother getting a price quote.)

He opined that, if lightened in some areas, a replacement could be made in 4130 chrome moly steel.

So, that's what I'm having done right now. Another fellow has designed it in SolidWorks, and will CNC it next week.
I'll have it professionally prepared/primed/painted in a matte or satin black.
Photos and flight test to follow.

If I like it, I may offer them for sale to the brethren.

22 March 2018 news: Now installed and test-flown!

Regards, Kolibri
 
Last edited:
Just as an aside, I removed and inspected the Sparrowhawk PSRU plate on my conversion. No cracks found, nicely radiused corners and holes. It has about 600 hours time in service, and the rest of the gyro was not well maintained. Lots of overdue components, frozen bearings and rod ends, etc.
 
Your PSRU plate was made by AAI, vs. RAF, which is probably why it's held up.
I've not heard that it's prone to crack, either.

Regards, Kolibri
 
Earlier this week I ran my RAF cyclic through its full range of motion, carefully inspecting for any binding all
control rod ends (especially the lower pair on the control yoke). At all "4 corners" of the cyclic (especially aft-right and aft-left),
all 4 push tubes must have some swiveling freedom available. If they do not, then they're binding up and you should readjust
them before flight. (Every pre-flight inspection should confirm this, and a singleton pilot can do so on his own.)

All was in order, but I do have some supplementary comments.


the upper pair on the gimbal arm:
currently: Aurora CM-6 (22° -- 5,068 lbs -- $9.33).
With the Sport Copter arm, the previous Heim HM-6M housings were too wide, so I had to replace them during my Jan 2016 installation.
The Aurora CM-6 are their "Economy" class part, but it was at the time all I could immediately acquire and Jim Vanek deemed them acceptable.
I consider the CM-6 the best overall bargain value for a mere $8, and without any significantly risky tradeoff of quality/strength for the price.

However, I will feel more comfortable replacing them for stronger rod ends, such as the Aurora CAM-6 (22° -- 9,088 lbs -- $13.11),
and relegating the CM-6 to the middle at the scissors.


the middle two pair on the mast scissors:
currently: Heim HM-6M (6° -- 4,000 lbs -- $30).
These positions have the least misalignment required, but one must nonetheless washer them away from the scissors (requiring a longer bolt).
One washer per side of the spherical ball will provide about .040" of housing-scissor clearance from side-to-side. This is sufficient, though not generous, so I will be relocating the upper Aurora CM-6 pair to the middle. (The Heims will be swap out OEM RAF landing axle rod ends.)

While you're at the scissors, remove/inspect the AN6-57 bolt for galling and corrosion. Inspect the scissors for any cracking.
Replace any worn nylon washers. Relube the stack with anti-seize paste. The bolt should be mounted with the nut on the rear of the mast, not in front.


the lower pair on the control yoke:
currently: Heim HM-6M (6° -- 4,000 lbs -- $30).
For the RAF lower pairs, I now believe it prudent to choose greater-than 6° of misalignment angle for extra mechanical margin.
(While 6° will suffice there, they must be very carefully adjusted to prevent binding at extreme cyclic angles.) Although the
12° Aurora AM-6 is probably an adequate improvement, there are many 22° Aurora choices of at least 5,000 lbs radial static strength.
It would be difficult to maladjust a 22° control rod end, even for a newbie. The $9 Aurora CM-6 is OK, but their $13 CAM-6 is nearly twice as strong.

The Aurora XAM and HXAM rod ends are strongest of all, but have a 7/16-20 shank which is not applicable to RAF OEM push tubes.
Those who wish to install more robust tubes of .120" wall 6061-T6 could have new inserts made for the XAM/HXAM rod ends.

Below is a screenshot from my revised pdf on RAF control rod end choices.


INSTALLATION TIPS:
When swapping out rod ends, before removing the old ones you should mic out the distance between the eye-centers
and the push tube. Notate the values with a Sharpie on the tube ends.

Sparingly lube the spherical ball with something light, such as TriLube or a very thin grease.

Steel shank rod ends used in aluminum threaded push-tube inserts require some anti-seize paste to prevent galling.
Remove any paste from the exposed shank where the jam nut will go.

When seeking the proper rotational position of each rod end, use full aft-left/right cyclic to indicate where the misalignment boundaries are.
Remember, each pair of a tube's rod ends are adjusted in relationship to each other, throughout the entire cyclic range. When tightening the jam nut,
simultaneously retain the rod end, and do not overtorque.

Balance each tube's pair of shank insertions so that exposed threads are roughly equal and not in excess of .5 diameters.


CONCLUSIONS:
What I like about the Heim HM-6M is the quality and magnetic particle inspection, but I wish they had a higher misalignment angle
than just 6°. They are sufficiently strong at 4,000 lbs., but not hugely so. They can be adjusted to fit reliably in the RAF control system,
but there is admittedly little margin. Thus, they're probably not the ideal lower control rod ends for the RAF newbie.

If RAF owners merely swapped out OEM junk 3/8 rod ends for eight Aurora CM-6 (a mere $74), they would have new and stronger parts
with zero binding risk (assuming a non-idiotic installation). However, for another $4@, they could have nearly twice the strength with the CAM-6 rod ends.

I consider any of these Auroras, when competently installed and diligently maintained, to be RAF-lifetime parts.
I see no reason to routinely replace them at RAF's designated 250 hours (which, however, was relevant for their junk OEM rod ends).

Regards, Kolibri
 
Last edited:
I've my own method of notating my gyro repair records, which is more detailed than the logbook entries. Here's a sample of it from the .doc file I created. I prefer information to be easily digestible at a glance, so the items in bold are the most recent of any reoccurring service (hourly inspection, oil change, scheduled part replacement, etc.). When I service that item again, I unbolden the previous entry. This requires a bit of file maintenance, but I enjoy the payoff.

Service or part replacement of an apparent "one-time" nature I do not embolden (e.g., carb overhaul, Aurora CAM-6 control rod ends).

Also, when a part is replaced I like to notate the date and hour length of its service. Often included is the part # and cost.

Date format is year/month/day in 8-digit. I save many files this way, which aids in sorting.


I believe in regular oil analysis and have found Blackstone to be a quality bargain and easy to use. Their supplied plastic containers are free and postpaid. Analysis is only $28, and they'll promptly email you a comprehensive pdf report including some personal comments by a tech. If a motor is running well and not making metal, I generally have the oil analyzed every other change. If any values begin to concern me, then I'd have each oil change analyzed.


sample of digital RAF logbook.png


___________________
For my annual inspections I notate how long current items (belts, primarily) have been in service and when they're due for replacement (items are chronologically listed by this time frame, rounded to the nearest RAF Inspection period).


RAF spark plug analysis.png


During that time, I compiled gph data from 4000-5100rpm at 50rpm intervals in order to calculate best range and economy. I summarized this in a cruise 4400-4800rpm table for easy reference. (After I installed Sport Rotors, a new table had to be built for the higher cruise speeds at same rpms. Finally, I've achieved what the broker represented to me as 70mph/6gph.) From that, I built an index card size data table of what my speed/range values mean from homebase to all my commonly flown routes and destinations. Any leg taking less than 10 gallons is highlighted in green, 10-15 gallons in yellow, and 15+ gallons in red. (All this assumes zero wind, naturally. Real conditions rule. "The map is not the territory.") This table is laminated and within reach.

Finally, I inserted jpgs of all the RAF hourly inspections (25, 50, 100, 200, and 500) for easy reference, and then compiled a coarse one-page summary of them.

My actual repair logbook I update as I go, but without the .doc file detail (because there's no room).

This separate detailed log sheet I print out for an on-board copy in the gyro, and is also archived with my next-of-kin, to aid investigators finding any possible mechanical cause in the event of a fatal crash. Pdf versions are also archived in my tablets, which I can refer to in-flight if necessary.

The next owner of my RAF will also get his own copy, which includes not only my service history but that previously of the builder (which I entered from his logbook). By 550 hours, I will have flown this RAF more than the builder or anyone else (a personal goal), and that's about when I plan to offer it for sale. At that point, there will be no scheduled component replacements for another 100-125 hours, which will allow the new owner 2-3 years of stress-free flying with little maintenance expense. That's something that I didn't get to experience, and I'll be glad to spare the next guy.

My digital logbook method may seem overly tedious to some, but I enjoy creating this sort of at-a-glance-detail. Perhaps you might, too.

Regards, Kolibri
 

Attachments

  • 2017 annual inspection of my RAF.png
    2017 annual inspection of my RAF.png
    25.3 KB · Views: 10
Last edited:
Right on the dot at 500.0 hours, I performed all 25/50/100/200/500 Hour Inspections on my RAF 2000.
(I'll endeavor throughout 2018 to inspect at such precise intervals, to present the next owner with such tidiness.)

I'm long past the newbie Dunning-Kruger stage of ownership (i.e., not knowing what I don't know about its pitfalls).
It's been an "interesting" journey, and I've learned a lot.

When it reaches 535 hours, I'll have then flown it more than anybody else including the builder. At about that time, I'll offer it for sale.
As it stands now at 505 hours, I believe it to be one of the best maintained and upgraded RAFs around, with all major and most minor systems
carefully inspected (if not replaced). All previous RAF-typical (or Fritts-typical) flaws and apathies have been resolved. I will be able to sell it to a
gyro newbie with full confidence and a clean conscience.


A FEW REMINISCES:

prerotator clutch: I'd originally seen the OEM 1/4" shaft key quickly lose its corners, and cable grease would goop back into the PTO unit and onto the plate. A 5/32" key (with shaft and plate key holes so enlarged) has been the answer, and a 12mm x 28mm x 7mm oil seal (SKF #562570) behind the drive pulley has kept the plate free of grease. After a freshly scuffed up clutch plate and optimally adjusted clutch cable, I can get 180-200rrpm if I need such for a soft/short field takeoff. (I usually go to only 160 before my roll.) It still has the older longer spindle, and I may have made a shorter one that RAF later went to.

leaking front seam of fiberglass fuel tank (as knowingly sold to me by CFI/broker Fritts of N5002E infamy): After years now of this fix, I continue to highly recommend 3M #04240 Semi-Rigid Plastic Repair. (First diegrind a deep "v" within the entire seal to increase bonding surface area.) It's held up 100%, and is probably stronger than the parent material. I can't praise this product enough. There's been ZERO apparent degradation. It is THE stuff for those older RAF fiberglass fuel tanks. (I.e., forget Proseal, etc.)

With my full Sport Copter mast/rotor system/air-trim upgrade, I've enjoyed 130+ hours of serenity, not having to ever wonder when (not if) something in the poorly designed/made OEM RAF system will wear out or fail. Given the robustness of the SC design and mfg., I consider it a "lifetime" upgrade for the RAF, as no owner will likely ever use it up.


_____
If I were keeping my RAF past next year, the only remaining items I'd still add are perhaps a hydraulic p/r clutch actuator (many here, especially Larry Boyer, have fabbed such), an Electroair electronic ignition (mostly as a precaution, as my RAF didn't get one of the bad batch cases with acidic sealant which caused so many failures), moving back the main gear 5" and adding shocks, and castering the nosewheel.

If 130hp isn't deemed sufficient, a very long term next owner may, after using up the OEM 2.2l carb engine (which is running like a top at 500 hours with full 80 psi compression in all cylinders), consider installing the 2.5l motor (and perhaps turbo with 5-blade prop). While he's at it, the Boyer Keel mod would be appropriate then.

Meanwhile, the very new Holley Sniper EFI kit would bolt right on, for <$1,000. Reviews seem positive. No more carb!

A worthy mod that somebody here may want to develop is an easily removable engine cowling, if only an upper half shell. This would greatly enhance the looks of the RAF, and probably reduce the vortex shedding that causes so much wig/wag yaw, while adding to cruise speed.

Regards,
Kolibri
 
My RAF prerotator clutch has the old extension for the cable. The shorter clutch shaft does away with this extension, and is preferable (requiring less cable bend), but is available only from RAF/RAFSA (or custom made).

Threaded into that aluminum is a .25x28 bolt to secure the p/r cable end. In order to often grease the cable, this bolt must be loosened, and over the years the aluminum threads give way.

Here's a solution that works for me: a machined steel collar drilled/tapped for the bolt.
Drill out the existing hole in the extension.
Bead-blast and paint with Krylon Hi-Heat Satin Black, which nicely matches the anodized aluminum.

(The stainless bolt pictured was all I had on hand for photo; a cadmium bolt was later used in the part.)
Any jam nut will do, but I used a heat nut.

Secondary retention for the cable ends is a wise precaution.

Regards,
Kolibri


RAF 2000 locking collar for prerotator cable cluth-side housing.png
 
Kolibri;n1138366 said:
My RAF prerotator clutch has the old extension for the cable. The shorter clutch shaft does away with this extension, and is preferable (requiring less cable bend), but is available only from RAF/RAFSA (or custom made).

Threaded into that aluminum is a .25x28 bolt to secure the p/r cable end. In order to often grease the cable, this bolt must be loosened, and over the years the aluminum threads give way.

Here's a solution that works for me: a machined steel collar drilled/tapped for the bolt.
Drill out the existing hole in the extension.
Bead-blast and paint with Krylon Hi-Heat Satin Black, which nicely matches the anodized aluminum.

(The stainless bolt pictured was all I had on hand for photo; a cadmium bolt was later used in the part.)
Any jam nut will do, but I used a heat nut.

Secondary retention for the cable ends is a wise precaution.

Regards,
Kolibri


yes lets just add more steel [weight] to an already heavy machine. Just don't over tighten the bolt.

The best fix and probably the cheapest is to have Calumetair make up a new housing and cable ,I use a

synthetic grease that has PTFE in it [ that's the stuff they use on stick free skillets],

You cant believe how easy it is to turn the prerotator cable with the new parts,its amazing.

I shortened my cable housing to 51" to reduce the radius. In fact the distance that the clutch plate is from the

clutch disk is now critical, if it occasionally is rubbed by the clutch disk it will spin.

I can now wind up to 200 rrpm faster that I could get 150 rrpm at the same engine rpm

The complete setup cost about $282.00 and that included shipping.

The picture show the new radius and the safety cable attached to housing.
 

Attachments

  • IMGP6682.JPG
    IMGP6682.JPG
    66 KB · Views: 15
I have been selling my improved RAF mast bushing for a couple of months now
You mean the ones you added a steel bushing to inside, increasing the weight? :wink:
Mine from Paul Patterson without any steel still looked new after 130 hours.

My p/r cable is also 51" -- probably the ideal length.
 
Yep the bushing that has a 70 shore rating, the steel insert weighs less than an ounce and makes the bushing last a whole lot longer.
 

Attachments

  • DSCF2167.JPG
    DSCF2167.JPG
    18.9 KB · Views: 6
Last edited:
However, when I installed a custom $500 stainless steel exhaust system that shaved off many pounds from the OEM pig iron RAF exhaust, did you praise my having done so?

In fact, with that, and the heavier redrive plate, it's not only an overall weight wash, but I slightly raised the cg which slightly reduced the prop thrust offset.
 
Kolibri;n1138465 said:
However, when I installed a custom $500 stainless steel exhaust system that shaved off many pounds from the OEM pig iron RAF exhaust, did you praise my having done so?

In fact, with that, and the heavier redrive plate, it's not only an overall weight wash, but I slightly raised the cg which slightly reduced the prop thrust offset.


All you did was replace about 2' of steel exhaust pipe,you used the stock Subaru headers and replaced the muffler with

another stock OEM one,there was no weight savings as you claim, stainless weighs the same as cold rolled steel,and some stainless

actually weighs more.

So whats there to praise,it certainly is not your claim of weight savings,maybe its the fact that you got ripped for $500 bucks
 
Last edited:
Kolibri;n1138465 said:
However, when I installed a custom $500 stainless steel exhaust system that shaved off many pounds from the OEM pig iron RAF exhaust, did you praise my having done so?

It is my observation the original RAF exhaust is not made from pig iron.

Most of us keep our aircraft airworthy and don't expect praise for doing so.
 
All you did was replace about 2' of steel exhaust pipe,you used the stock Subaru headers and replaced the muffler with
another stock OEM one,there was no weight savings as you claim
, stainless weighs the same as cold rolled steel,and some stainless actually weighs more.

So whats there to praise,it certainly is not your claim of weight savings,maybe its the fact that you got ripped for $500 bucks
eddie, feel free to toss out more of your soft pitches.

First of all, the muffler was not OEM, but a custom system made just for me by a renowned aircraft exhaust firm.
Second, it was was much thinner walled than OEM.
Third, the custom system weighed over 10 lbs. less.
("pig iron" was meant as metaphor, not metallurgical fact. It was about as heavy as pig iron, with similar corrosion.)

Another benefit was that I increased the clearance between the top of the can and the oil pan, making oil changes much easier.

I gained a bit more power, and 50rpm. It seems a little more quiet, too.
I'm very satisfied with my custom exhaust, and nothing inside will ever break loose and rattle as the OEM do.


Kolibri's RAF exhaust -- OEM vs. custom.png
 
Do you really expect me to believe that there is 10 lbs of weight difference between the two mufflers.

Get ready to swing away slick, more soft pitches coming.
 
The OEM RAF exhaust system is so heavy it could have come off of a John Deere tractor.
I just lugged it to the trash last month while cleaning up my hangar.

Since I physically handled them both, yes, I do expect you to believe me.
Unless you are calling me a liar, and if so, then you and I will have a squaring off.
 
Last edited:
Unless you are calling me a liar, and if so, then you and I will have a squaring off.

Eddie, you had better back off cause you will be squaring off against kolibri the world's smallest gun: image_130898.jpg


or Kolibri the hummingbird: kolibri bird.jpg


either way youre no match against Kolibri
 
Top