Cheek Plates 101 - What's Wrong With This Picture?

NoWingsAttached

Unobtainium Member
Joined
May 21, 2006
Messages
4,871
Location
Columbia, SC
Aircraft
Air Command Tandem w/ Arrow 100hp; GyroBee w/ Hirth 65hp; Air Command Tandem w/ Yamaha 150hp
Total Flight Time
>350
Moving the head mount forward on this a full 6" after swapping out the 320 lbs 130 HP Subaru for a 170 lbs 160 HP Yamaha, permanently leaving elephant Soobie mother-in-law on ground permanently...

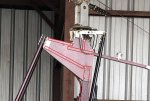
Just finished up the Visio cheek plates redesign this evening, thought to share with you the old problems that jump out that need to be eliminated.

Anyone care to share thoughts for improvements on the obvious here? Hidden 1x2 rectangular tubing indicated in red lines. Yikes.
 

Attachments

  • Air Command Cheek Plates 1.jpg
    Air Command Cheek Plates 1.jpg
    92.5 KB · Views: 121
As you can see, the underside creates a large, open pocket to catch the air coming straight at it, needlessly creating a LOT of drag.

Next, there is no continuity for the 1x2 bracing between the mast and the head, a distance of over 5" minimum (13" to the head anchor) relying solely on the .125" cheek plates for rigidity and support. Within that same space resides the upper strut taking the entire wag of the massive vertical stabilizer on a torque arm 4.5 ft long. A sideways force against the tail of just 10# results in a momentary torque of 45# on the cheek plates where there is no vertical bracing tied to the mast.

When I moved the head fwd 6", I dropped the bottom 1x2 flush with the bottom of the plates to eliminate the pocket. Next, I installed a 1x2 that runs from the top of the mast to abut the fore head anchor leg with flush-cut angles, and another from there to the front support struts that carry the airframe load afore of the mast.

IMG_8388 (640x480).jpgIMG_8385 (640x480).jpg
 
Getting rid of the 325 lbs 130HP Subaru and replacing it with the 175 lbs Yamaha 160 HP engine means that the head is moved to the position above the rear seat where Dennis Fetters originally designed it to go when the Air Command was built around the 110 lb 110 HP Arrow engine.

With the head so far back to accommodate the heavy automobile engine, when a passenger and/or fuel was added to the rear seat it caused a nose-heavy condition and required excessive back-spring tension trim to get the gyrocopter to fly S&L.

This is fine and dandy - until the spring trim fails and Mr. Muscleman goes into tetany as he he tries desperately to prevent at first a sudden bunt over, and then continues to struggle back to the airfield with both arms wrapped around the stick. Good time for a heim joint failure, that.

I've left enough material on the cheeks plates for more fore-aft adjustment to fine tune the airframe for a near-neutral stick with zero back trim spring pressure at normal cruise S&L flight speed. (The way it should be.) Any faster, and I like a bit of forward stick pressure and feel what the machine is doing as the disk AOA flattens out. Any slower, and I like to trim it out with the electric trim motor. Like for landing, after cutting power, I like to add back all the available spring tension trim and let the trim system hold the stick back for me.

As it looked during the hang test with experimental add-on cheek plates, the gyro is tuned for a 270# pilot maximum (empty Fr tank), and 145# minimum (full tanks). Kids and adults lighter/heavier than that will need to fly in the back seat.
 
Last edited:
Top