Aluminum Ordered for Hornet Build

Hi Folks:

Well, I met with a local gyrocopter builder, JazzenJohn, and I have narrowed the build down to the GyroBee. The metal I ordered will do for the things I need to get done. To be sure there will be more metal ordered as a stainless steel cluster plate is used at the base of the mast and the landing gear is a bit different. There are some suggestions for the engine mount and seat mounts that will be installed. But all this is moot unless I get my table together for assembly of the big parts and steady platform for the drill press. The basement will be utilized to build the small parts, grinding, cutting and drilling. That is after I get the honey do list for the stairs done.....

Thanks for all your support so far.

Curtis Scholl
 
Hi Curtis.

Nice to read you've settled on the Gyrobee - as have I. There are a number of things, that were done differently by Doug Riley, among others.
He built a 3 degrees negative incidence in both horizontal stabilizer and engine mount. And I am wondering, if I should do the same.
After all, the Gyrobee tilts up a bit in powered flight. I just paid my ney propeller, 60" 3 blade Warp Drive. And I have aluminum for the frame.
I had to make a 1500 km (ca. 900 miles plus ferry) round trip to pick it up - and the seller didn't even have it all. But I have my engine, head and blades.
So the fun part should start now. Also 3 ground school tests down - 5 to go. Plus radio tests.

We could start some kind of group - "Builders and pilots of the Gyrobee" - as there are at least some of us now.

Cheers
Erik

Cheers
Erik
 
I 2'nd the vote for a GyroBee group. But there is a GyroBee section on the forum. I will be posting more construction pics and asking more questions, just not sure if it goes under GyroBee or here in Builder's Corner. It'd be nice to get this forum rockin' again with daily progress photos for the knowledgeable folks here to comment on. Would love for us to have several build threads going on at once.
 
Well Gents, the winter has held me up on progress...workspace was -20 F for a few weeks. But it gave me time to figure out I need a workbench and grinder/sander in the basement to make the smaller parts.The large stuff has to wait for spring. Progress not perfection.
 
Good Day to you all!!

Happy Mother's day to all of the moms on the board.

I have spent the last weekend treating the wife to Dinner and Breakfast out. My son cooked a duck for her with a very nice gastrique made with blackberries. He is a good cook.

I earned my release to do the cleaning up of the workspace. Garden tools on hooks, Power garden tools on hooks in appropriate places, floor of the lean-to mostly cleared.
The metal for the gyro is now out of the packing tubes.

I took the 10 in miter saw out of its box, and mounted on a workbench, both had been sitting since Christmas.

I went to Lowes and got a metal cutting blade for the miter saw.

After some discussion with JazzenJohn, I have finally decided to make a Taggart Gyrobee for taking a first whirl at building an autogyro. So, I spent quite a surprisingly short time cutting the Mast, forward keel and the cluster plates for the gyro. And I though I was done, then I remembered, the tail boom needs to be cut....so Next week.

Gotta order the AN-3 bolts now,,,,I forgot to order them when I ordered the AN-4 bolts last time.

Progress, not perfection, at this particular moment.

C YA!!

Curtis Scholl
 
Curtis, why did you decide to build the gyrobee instead of the hornet?
Thx!
 
Looking at the two...and thinking about the drop keel, and being the very first experience...I thought the Gyrobee was a simple build with no extra cluster plates. It is a straight forward build with "spring" suspension. I am getting lighter...and if I build this right...it will be under 254 pounds. And later, I can add a drop keel...with appropriate gear mods.
 
Last edited:
Hi Folks:

Update on progress.

I was not feeling all that well, but cannot fathom the reason.

I was only able to get the tailboom cut to length this week.

I took Sarah out on Friday to a little Italian restaurant in Tecumseh Michigan. On Saturday we started our day as usual with errands. And Sarah started work on the yard that afternoon, and it rained and the work carried over into Sunday. So, I scrambled for some time to cut the piece. I wanted to get to the cluster plates and mast to locate and punch the plates for the drilling, but yard work got in the way.

Some days diamonds, some days coal.

Curtis Scholl
 
Happy Memorial Day (belated).

Progress Report.....

As you know the cluster plates for the Gyrobee were cut and deburred a couple of weeks ago. I went over them again with a file because they were a little wider than the 2" tubing and they still felt a bit rough.
With a little elbow grease and a lot of aluminum filings on the floor, they were just the 2" I needed. And I rounded the corners a bit more.

Yesterday I wrapped them in masking tape, marked the masking tape to center the bolt holes, and center punched them. Then it was off to the drill press. The masking tape held them together as well as keeping machining marks from occurring. That went well. But now I wonder...did it go TOO well. I get this feeling at times when I am building stuff. If it goes too well, I missed something. We shall see.

With that accomplished, I marked the forward keel drilling locations and went to the press once more. I started this time with the 1/4" bit. And discovered an irritating fact about my drill press.

To wit: When is a 2" depth drill press not a 2" depth drill press? When the drill press won't cut completely through a 2" piece of aluminum tubing. Frustrating. I have to see if there is a retrofit for a Harbor Freight Drill press to get more throw.

But there was a bit of grace...the inner wall on the opposite side was countersunk enough to self center the drill bit in a 18V hand drill and not worry about scratching the sidewalls. At least right now, the 3/16" AN3 bolt positions are done. It was getting late and the sun was setting, and the light in the garage are not bright enough to keep it going.

Note to Self: Gotta work on lighting a bit more. Maybe a mounted light on the bench with a flexible gooseneck?

God Bless!

Curtis Scholl
 
Chris,

I had a similar problem once with a 2" drill press that wasn't quite. Drill through the first wall with drill bit high in the chuck. Turn off the machine and lock the drill head in the lowered position with the chuck almost touching the part. The bit itself serves as an indexing pin now. Clamp the part to the bed, release the drill head height lock and loosen the chuck. Slide the bit downward and re-tighten the chuck. That extra drill bit length now should get you through the other side. I go through a similar process when turning pilot holes into fastener holes. Index then clamp.
 
Brian:

Thanks. This recommendation will save me the time of trying to reinvent the wheel. I will definitely keep this in mind for the rest of the deep work.
 
Brian,
Very appreciated for your respond.
I have a little question.With drill press you use it?I mean with brand and model.Thanks in advance!
Jon
 
Last edited:
JohnyWalter;n1134046 said:
Brian,
Very appreciated for your respond.
I have a little question.With drill press you use it?I mean with brand and model.Thanks in advance!
Jon

Hi Jon.

The one I use now is a Porter Cable floor-standing unit. But in the past I used a cheap Chinese benchtop press with good results. As long as the runout (bit wobble) is minimal a modest machine is sufficient.
 
Brian Jackson;n1134048 said:
Hi Jon.

The one I use now is a Porter Cable floor-standing unit. But in the past I used a cheap Chinese benchtop press with good results. As long as the runout (bit wobble) is minimal a modest machine is sufficient.

Thank you for respond!
 
Hi Folks:

Progress!!

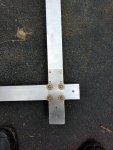
I drilled holes and assembled the mast and the forward keel. I made a mistake in the order for washers so the large ones are in place temporarily and the exact units are on order. I now know why people "match drill" assemblies. No matter how well you measure and drill, it will always be just a bit off......

God Bless

Curtis Scholl

Pics attached IMG_20180602_140854665.jpgIMG_20180602_140926880_HDR.jpg .
 
Hi Guys!!

Fiddlesticks!!!

I just realized that I have metal for the Hornet which uses 2" x 1/4" angle and 1 1/2" by 1/8" angle. And I need 1" x 1/8" angle for the seat uprights and I can still use the 1 1/2" by 1/8" for the engine mount areas. I found out by cutting the angle for the seat rests and realizing that a 1/2" center hole does not center on a 1 1/2" piece....

I am laughing out loud for not taking that into consideration.....so another Online Metal order is on the way.

Some days you get the dragon, some days the dragon gets you....LOL

God Bless

Curtis Scholl
 
Hi Folks:

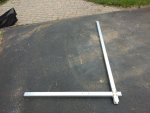
I cut and drilled a few more pieces...the keel was cut but not fitted/drilled. Now the seat supports are in. Assembly was a bit troublesome, as some drill holes were off a bit, but between the hammer and a file...well, you know the rest. This was a test fit. The tailboom has some fitting to do at the rear for the tailwheel plates and wheel and the cutout. Next week.

Curtis Scholl

IMG_20180603_154622518.jpg
 
Top