Helicycle Hatchery

Looks good Stan. you always do great work and make the hard look easy.

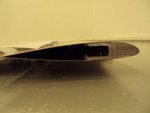
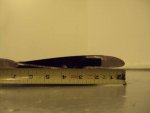
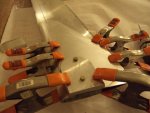
how thick is each plate? and what did you cut them out with?
 
Jon- Nice talking to you on the phone today. You are a master at building rotors.....hey...Master Roda! I am glad our conversation cleared up a big mystery in my mind about my other rotorblades. You filled in the missing piece to the puzzle that has had me perplexed for over 3 years now.


Here are some pictures of my Helicycle rotorblades. They measure 7.25 inches wide...have a 0.875 height.....and the spar is 2.5 inches deep...rabbeted out to receive the 0.050 skins. You can see they are asymetrical.

I see no twist in them.


Stan
 

Attachments

  • DSC01456.jpg
    DSC01456.jpg
    15 KB · Views: 1
  • DSC01455.jpg
    DSC01455.jpg
    16.4 KB · Views: 1
Tim- Each doubler is 0.025 6061 aluminum. I cut them out with a sabre saw with a metal cutting blade. Sandwiching them with 1/4 luan plywood is the secret to cutting them out. I just gang cut them four at a time. I wante each one to weigh the same....and I figure if they are the same exact profile....then thats the best I can do.


Stan
 
Stan,

Thank you for taking the time to talk to me. I think I will be able to reproduce those blades in our fashion. All I have to do is convince Jim to allow me too :)

Good luck with bonding!!
 
Stan, you sure make it look easy.

Mike
Yaw Mon!!
But thank God they have curves because he's told us time and time again he can't make anything straight?:wave:

He makes everything he does look easy!
 
I used an outfeed roller as my tool of choice to conform these doublers so they would fit nice to the airfoil. There is a stack of four on the top and bottom of each blade...a total of 16 to prepare. It took me awhile to get the hang of forming the aluminum. I also used a block of wood with a saw kerf to give the leading edge ever so slight corrections....then I used my roller on a stand to work the metal into the proper but changing curve...like an airfoil has!

The build video shows using epoxy.... but then sanding off all the epoxy that gets smeared all over. I am not going to do that...and a little time blue taping will make my stairstep doublers have minimal work. I will be glueing up the top and bottom and one time...bolts will be going through those aluminum blocks...plus a lot of clamps and clamping cauls will be used.

I am very satisfied with the fit of these doublers..and they wont need hardly any pressure to make them tight.

I will scotchbright them next....acetone...and then some special activator will be applied before the epoxy is spread on.

This is just another glueup now...


Stan
 

Attachments

  • DSC01491.jpg
    DSC01491.jpg
    25.5 KB · Views: 1
  • DSC01490.jpg
    DSC01490.jpg
    32.9 KB · Views: 1
  • DSC01499.jpg
    DSC01499.jpg
    20.8 KB · Views: 1
  • DSC01501.jpg
    DSC01501.jpg
    25.5 KB · Views: 1
  • DSC01507.jpg
    DSC01507.jpg
    26.1 KB · Views: 1
  • DSC01512.jpg
    DSC01512.jpg
    23.9 KB · Views: 1
  • DSC01506.jpg
    DSC01506.jpg
    32.3 KB · Views: 1
  • DSC01505.jpg
    DSC01505.jpg
    36.4 KB · Views: 1
Heres the last pictures. The bottom half of the rotorblade was easier to fit the plates to as the camber is less.

After the doublers were all stacked exactly as desired....I clamped and drilled through the factory spar holes...and now they are indexed. I then blue taped them off....and disassembled them. I will scotchbrite them lightly one more time...then use acetone on them till the rags are clean. A special activator will be applied to all glued faces....the epoxy mixed and applied....then one rotorblade will have its doublers all installed.

Stan
 

Attachments

  • DSC01513.jpg
    DSC01513.jpg
    26.9 KB · Views: 1
  • DSC01519.jpg
    DSC01519.jpg
    23.6 KB · Views: 1
  • DSC01520.jpg
    DSC01520.jpg
    24.5 KB · Views: 1
  • DSC01522.jpg
    DSC01522.jpg
    25.1 KB · Views: 1
Looks good Stan. will the blades be painted or left bare?

you always do such nice work, that is going to be a helicopter you can enjoy for along time.
 
Tim- I originally was going to paint these ....but after a lot of thought and studying others that have painted.....it isnt worth looking at painted blades slowly having the paint eroded off....

When I get them back....I am going to go anal on them.....and polish them to a mirror finish.... There was a good article in KitPlanes about how once a fine finish is on....its just a routine touch up. I wont have near the problem with the finish as it is in a heated and airconditioned hanger...

Stan
 
Great news Laurent!
We would love to have another helicycle building tread!
 
Dear Stan,

As a futur Helicycle builder I would like to thank you a million times for your effort and efficiency in communicating every aspect of your amzing work you're doing on your helicopter!

I must say that it is because of YOU ONLY that I took the decision to buy this helicopter, as the very few information provided by Eagle R&D were not sufficient to me to take a clear decision, based on technical basis.

Once more thank you very much for what you've done and are doing throught your building process.

Best regards


Laurent VELATI
Welcome to the Forum, looking forward to seeing your build thread when you get yours.

I am presently rebuilding a classic Helicom Commuter Jr. helicopter, check out my build thread under helicopters.
 
Laurent- You wont be disappointed with your kit. Just relax, chill out while you are waiting for your shipments. I signed the contract knowing this was the terms...so I am not complaining. It is a fun build.


Stan
 
Laurent welcome and good luck with your project. Oh yeah and if no one has mentioned it yet.....WE DO LOVE PICTURES :)
Cheers
 
I bonded the doublers to both sides of one rotorblade. I wont try eating a whole elephant again! They came out nice...but man was I busy....I had 40 minutes working time.....and I finished in time...but the next blade will be done one side at a time.


The first picture is my new "quick" way of shaping the doublers. The trick is automatic transmission creep. Its hard to fine tune the curvature. Please use a standard brick....I calculated it to be the right thickness with my size of tires!

Seriously....the others are the glue up process. I happen to have plenty of clamps...and I used plenty.

The last pictures are the doubler plates being loosely fit to the next rotorblade. I will bond these next week...and have the rotorblades back on the truck to Idaho.


Stan
 

Attachments

  • DSC01526.jpg
    DSC01526.jpg
    39.9 KB · Views: 1
  • DSC01534.jpg
    DSC01534.jpg
    57.7 KB · Views: 1
  • DSC01530.jpg
    DSC01530.jpg
    46.7 KB · Views: 1
  • DSC01532.jpg
    DSC01532.jpg
    40.4 KB · Views: 1
  • DSC01527.jpg
    DSC01527.jpg
    18.8 KB · Views: 1
  • DSC01536.jpg
    DSC01536.jpg
    24 KB · Views: 1
  • DSC01537.jpg
    DSC01537.jpg
    23.5 KB · Views: 1
  • DSC01523.jpg
    DSC01523.jpg
    21 KB · Views: 1
Have you got enough clamps there buddy?

Man you told me over the phone, how many clamps you were using. But it looks a lot funnier seeing it!

Gee's only you would start out by doing both sides at once! Not enough of a challenge for you or what?

PS:
I don't even know how you got all those clamps off, then peal the tape off and put them all back on to dry in time?
 
John- Even though they came out nice....hindsight shows my eagerness to go at this like a 24 foot curved handrail glueup. I rehearsed the procedure...had my top and bottom doubler plates separated and CLEARLY marked.....this should be a piece of cake. What I didnt practice in my rehearsal glueup was how slippery those clampling cauls and clamps get with epoxy all over. I was busier than a one eyed cat watching 6 mice....

I soon got it under control.....but next glue up will be more relaxing.


Stan
 
man ain't ya glad you do wood work for a living, most people would not have near that many clamps.

I bet that was a challenge.
 
Laurnent- I cant argue against vacuum bagging. If my stair stringers werent so long..I would be doint them that way.

There is however a very simple vacuum creating device. You just use a your shop air compressor and hook it up to a small venturi. This venturi creates unbelievable amount of suction...almost 14 pounds a square inch...which of course is the atmospheric presssure.

But anyway.....I am still old school both in my stairbuilding and helicopter building. Next life I will get with the program!:yo:

I will be looking forward to your build...and please study all my methods....as there are some you will want to try....and others that there are just plain better and easier ways.

One thing I can say is that it is a very educational and rewarding project.

I plan on this helicopter being the first machine that I accumulate more hours on in the air than building it.

Stan
 
I am very happy with the doublers on my first rotorblade. The last 3 pictures are the doublers being fit for curvature and they will be bonded sometime tomorrow. I am only doing one side this time.

When I get the blades back from Idaho....they will get sanded down progressively to a very fine grit...then power buffed to a mirror finish. I understand that once its a mirror finish, and the correct stuff is on...its not that much work keeping them that way. It will give me a good excuse as I am polishing them to be looking them over real close as an ongoing inspection.


Stan
 

Attachments

  • DSC01548.jpg
    DSC01548.jpg
    23.8 KB · Views: 2
  • DSC01547.jpg
    DSC01547.jpg
    21.9 KB · Views: 2
  • DSC01549.jpg
    DSC01549.jpg
    25.6 KB · Views: 2
  • DSC01550.jpg
    DSC01550.jpg
    19.3 KB · Views: 2
  • DSC01551.jpg
    DSC01551.jpg
    22 KB · Views: 2
  • DSC01544.jpg
    DSC01544.jpg
    30.3 KB · Views: 2
  • DSC01545.jpg
    DSC01545.jpg
    23.5 KB · Views: 2
  • DSC01546.jpg
    DSC01546.jpg
    25.3 KB · Views: 1
Top